Spring Boot + MyBatis 프로젝트 연습 목록
- 01. 신규 Spring Boot 프로젝트 만들기
- 02. Thymeleaf, spring-boot-devtools 추가
- 03. Spring Boot에 H2 추가
- 04. Spring Boot + H2 + Jdbc로 사용해보기 (현재 포스트)
현재 포스팅하는 시리즈는 Spring Boot와 MyBatis를 결합한 프로젝트를 연습하는 부분입니다. 하지만 이번 포스팅은 MyBatis를 설정하기 전에 먼저 Jdbc로 사용하는 방법을 확인하고 싶어 진행한 곁가지입니다. 01~03번 포스팅까지는 동일하게 진행되고 사용함에 있어 04.Jdbc / 05.MyBatis(이후 정리 예정) 이렇게 나뉘어집니다.
JDBC 사용하기
1. pom.xml에 아래 내용 추가 (앞선 포스팅 H2 설정하기에서 이미 추가하였다)
    <dependencies>
        <dependency>
            <groupId>org.springframework.boot</groupId>
            <artifactId>spring-boot-starter-jdbc</artifactId>
        </dependency>
    </dependencies>
2. account 테이블 생성 및 데이터 입력
: schema.sql 내용 변경 (이전에는 h2 설정이 잘 되었는지 확인하기 위한 테스트 테이블 생성이 들어있었다.)
DROP TABLE IF EXISTS accounts;

CREATE TABLE accounts (
  id INT AUTO_INCREMENT  PRIMARY KEY,
  email VARCHAR(255) NOT NULL
);

INSERT INTO accounts (email) VALUES
  ('email1@email.com'),
  ('email2@email.com'),
  ('email3@email.com');
3. Account 도메인 객체 생성
: /src/main/java 하위에 com.sosohanya.leveldiary.account 패키지를 만들고 Account 클래스 생성
(패키지 및 파일 구조는 본인이 선호하는 바에 따라)
package com.sosohanya.leveldiary.account;

public class Account {

	private long id;
	private String email;

	public long getId() {
		return id;
	}

	public void setId(long id) {
		this.id = id;
	}

	public String getEmail() {
		return email;
	}

	public void setEmail(String email) {
		this.email = email;
	}

	public Account(long id, String email) {
		this.id = id;
		this.email = email;
	}

	public Account(String email) {
		this.email = email;
	}

	@Override
	public String toString() {
		return "Account [id=" + id + ", email=" + email + "]";
	}
}
4. 데이터 처리 인터페이스 정의
: /src/main/java 하위에 com.sosohanya.leveldiary.account 패키지에 AccountRepository 인터페이스 생성
(인터페이스를 사용하지 않고 바로 클래스로 구현할 수도 있겠지만..나중을 위해서 그러지 않겠습니다. 인터페이스(Interface) 개념을 간단히 잘 소개한 생활코딩-인터페이스 페이지 보기 [새창])
AccountRepository.java
package com.sosohanya.leveldiary.account;

import java.util.List;

public interface AccountRepository {

	int count();

	long save(Account account);

	int update(Account account);

	int deleteById(Long id);

	void deleteAll();

	List<Account> findAll();

	Account findById(Long id);

	Account findByEmail(String email);
}
5. 데이터 처리 구현
: /src/main/java 하위에 com.sosohanya.leveldiary.account 패키지에 AccountRepository를 구현하는 JdbcAccountRepository 클래스 생성
JdbcAccountRepository.java 소스
package com.sosohanya.leveldiary.account;

//... import 구문 생략 ...

@Repository
public class JdbcAccountRepository implements AccountRepository {

	@Autowired
	private JdbcTemplate jdbcTemplate;

	@Override
	public int count() {
		return jdbcTemplate
				.queryForObject("select count(*) from accounts", Integer.class);
	}

	@Override
	public long save(Account account) {
		//자동 생성되는 키 리턴받기
		KeyHolder keyHolder = new GeneratedKeyHolder();

		jdbcTemplate.update(connection -> {
				PreparedStatement ps = connection.prepareStatement("insert into accounts (email) values (?)", Statement.RETURN_GENERATED_KEYS);
				ps.setString(1, account.getEmail());
				return ps;
	        }, keyHolder);

		return (long)keyHolder.getKey();

		//자동 생성되는 키를 받을 수 없다. 성공 또는 실패. 0 또는 1만 반환
		//return jdbcTemplate.update("insert into accounts (email) values (?)",
		//		account.getEmail());
	}


	@Override
	public int update(Account account) {
		return jdbcTemplate.update("update accounts set email = ? where id = ?",
				account.getEmail(),
				account.getId());
	}

	@Override
	public int deleteById(Long id) {
		return jdbcTemplate.update("delete accounts where id = ?",
				id);
	}

	@Override
	public List<Account> findAll() {
		return jdbcTemplate.query("select * from accounts",
				(rs, rowNum) -> new Account(
							rs.getLong("id"),
							rs.getString("email")
						)
				);

	}

	@Override
	public Account findById(Long id) {
		try {
			return jdbcTemplate.queryForObject("select * from accounts where id = ?",
					new Object[] {id},
					(rs, rowNum) -> Optional.of(new Account(
							rs.getLong("id"),
							rs.getString("email")
						))
					).orElse(null);
		}catch(EmptyResultDataAccessException e) {
			return null;
		}
	}

	@Override
	public Account findByEmail(String email) {
		try {
			return jdbcTemplate.queryForObject("select * from accounts where email = ?",
					new Object[] {email},
					(rs, rowNum) -> Optional.of(new Account(
							rs.getLong("id"),
							rs.getString("email")
						))
					).orElse(null);
		}catch(EmptyResultDataAccessException e) {
			return null;
		}
	}

	@Override
	public void deleteAll() {
		jdbcTemplate.update("delete from accounts");

	}
}
6. 단위 테스트로 확인 : 생성한 JdbcAccountRepository에 대한 테스트 작성 및 테스트
(부끄럽지만 실무를 하면서 단위 테스트를 적용해본적이 없어 아래 단위 테스트 내용은 단위 테스트 생초보의 작성내용이라는 점 감안해주시길 바랍니다. 저는 Java 생초보, 단위 테스트 생초보. 저는 여러 가지로 게으른 개발자였습니다. ㅠㅠ)
JdbcAccountRepositoryTest.java 소스
package com.sosohanya.leveldiary.account;

//... import 구문 생략 ...

@RunWith(SpringRunner.class)
@SpringBootTest
public class JdbcAccountRepositoryTest {

	@Autowired
	JdbcAccountRepository jdbcAccountRepository;

	String defaultEmail = "add@email.com";

	@Before
	public void setUp() {
		jdbcAccountRepository.deleteAll();
	}

	@Test
	public void count() {
		assertEquals(0, jdbcAccountRepository.count());
		jdbcAccountRepository.save(new Account("add1@email.com"));
		jdbcAccountRepository.save(new Account("add2@email.com"));
		jdbcAccountRepository.save(new Account("add3@email.com"));
		assertEquals(3, jdbcAccountRepository.count());
	}

	@Test
	public void saveAndFindAll() {
		jdbcAccountRepository.save(new Account("add1@email.com"));
		jdbcAccountRepository.save(new Account("add2@email.com"));
		jdbcAccountRepository.save(new Account("add3@email.com"));

		List<Account> getAll = jdbcAccountRepository.findAll();
		assertEquals(3, getAll.size());
	}

	@Test
	public void saveAndFindById() {
		long resultId = jdbcAccountRepository.save(new Account(defaultEmail));
		Account getAccount = jdbcAccountRepository.findById(resultId);

		assertNotNull(getAccount);
		assertEquals(defaultEmail, getAccount.getEmail());
	}

	@Test
	public void saveAndFindByEmail() {
		jdbcAccountRepository.save(new Account(defaultEmail));
		Account getAccount = jdbcAccountRepository.findByEmail(defaultEmail);

		assertNotNull(getAccount);
		assertEquals(defaultEmail, getAccount.getEmail());
	}

	@Test
	public void update() {
		long resultId = jdbcAccountRepository.save(new Account(defaultEmail));
		Account getAccount = jdbcAccountRepository.findById(resultId);

		getAccount.setEmail("update@email.com");
		jdbcAccountRepository.update(getAccount);
		Account updatedAccount = jdbcAccountRepository.findById(resultId);
		assertEquals("update@email.com", updatedAccount.getEmail());
	}

	@Test
	public void deleteById() {
		long resultId1 = jdbcAccountRepository.save(new Account("add1@email.com"));
		long resultId2 = jdbcAccountRepository.save(new Account("add2@email.com"));
		long resultId3 = jdbcAccountRepository.save(new Account("add3@email.com"));

		jdbcAccountRepository.deleteById(resultId2);
		assertEquals(2, jdbcAccountRepository.count());

		assertNotNull(jdbcAccountRepository.findById(resultId1));
		assertNull(jdbcAccountRepository.findById(resultId2));
		assertNotNull(jdbcAccountRepository.findById(resultId3));
	}
}- 오류 발생 : org.h2.jdbc.JdbcSQLNonTransientConnectionException: Database may be already in use: null. Possible solutions: close all other connection(s);
- 로컬 서버가 실행된 상태에서 JUnit test를 실행할 때 나온 현상. (이미 로컬 서버에서 Database를 사용중이라 생긴 문제로 파악됨)
- 해결 : application.properties 파일에서 spring.datasource.url 속성에 ;AUTO_SERVER=TRUE 내용 추가
- AUTO_SERVER=TRUE
: 서버를 수동으로 시작하지 않고도 여러 프로세스가 동일한 데이터베이스에 액세스 가능. 데이터베이스가 이미 열려있는지 여부에 관계없이 동일한 데이터베이스 URL 사용이 가능. (이 기능은 in-memory 데이터베이스에서는 작동하지 않음) 자세한 내용은 H2 공식 웹사이트 - Features : Automatic Mixed Mode 확인 [새창]
spring.datasource.url=jdbc:h2:~/leveldiary;AUTO_SERVER=TRUE
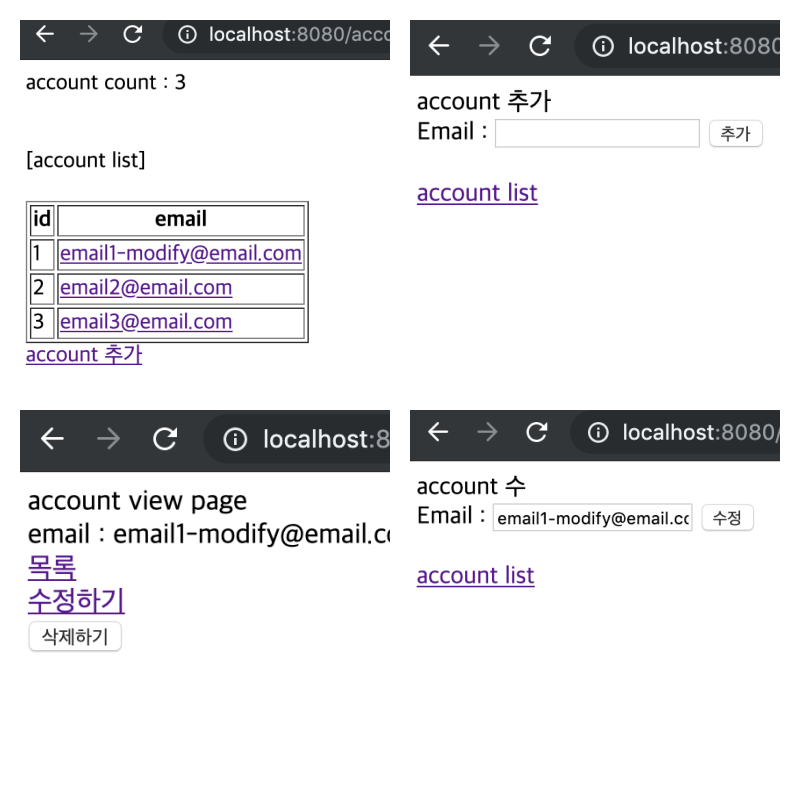
7. 위에서 생성한 JdbcAccountRepository를 사용하는 목록/내용보기/추가/수정/삭제 기능을 간단하게 구현
(프로젝트를 만들어보고 돌아가는 것을 보기 위한 것이기에 디자인적인 부분은 전혀 없습니다. )
7-1. AccountController.java 생성 (/scr/main/java 폴더내의 com.sosohanya.leveldiary.controllers)
package com.sosohanya.leveldiary.controllers;

//... import 구문 생략 ...

@Controller
@RequestMapping("/account")
public class AccountController {

	@Autowired
	JdbcAccountRepository jdbcAccountRepository;

	@GetMapping("/list") //목록
	public String list(Model model) {

		model.addAttribute("accounts", jdbcAccountRepository.findAll());
		model.addAttribute("count", jdbcAccountRepository.count());

		return "account/list";
	}

	@GetMapping("/add") //추가 Form
	public String add() {
		return "account/add";
	}

	@PostMapping("/add") //추가 처리
	public String addProcess(String email){
		jdbcAccountRepository.save(new Account(email));

		return "redirect:/account/list";
	}

	@GetMapping("/{id}") //상세보기
	public String view(@PathVariable Long id, Model model) {
		model.addAttribute("account", jdbcAccountRepository.findById(id));

		return "account/view";
	}

	@GetMapping("/{id}/modify") //수정 Form
	public String modify(@PathVariable Long id, Model model) {

		model.addAttribute("account", jdbcAccountRepository.findById(id));

		return "account/modify";
	}

	@PostMapping("/{id}/modify") //수정 처리
	public String modifyProcess(@PathVariable Long id, String email) {
		Account account = jdbcAccountRepository.findById(id);
		account.setEmail(email);
		jdbcAccountRepository.update(account);

		return String.format("redirect:/account/%d", id) ;
	}

	@PostMapping("/{id}/delete") //삭제 처리
	public String deleteProcess(@PathVariable Long id) {
		jdbcAccountRepository.deleteById(id);

		return "redirect:/account/list";
	}

}
7-2. src/main/resources/templates/account 폴더 생성 후 해당 폴더에 list.html / add.html / view.html / modify.html 파일 생성 (thymeleaf 템플릿을 사용)
- list.html
<!DOCTYPE html>
<html xmlns:th="http://www.thymeleaf.com"> <!-- xmlns:th를 설정하지 않으면 에디터에서 경고가 표시되어 신경쓰임 -->
<head>
<meta charset="UTF-8">
<title>Insert title here</title>
</head>
<body>
<div>
account count : <span th:text="${count}"></span>
</div>
<br/><br/>
<div>[account list]</div><br/>
<table border="1">
	<tr>
		<th>id</th>
		<th>email</th>
	</tr>
	<tr th:each="account : ${accounts}">
		<td th:text="${account.id}"></td>
		<td><a href="/account/1" th:href="@{/account/{id}(id=${account.id})}" th:text="${account.email}"></a></td>
	</tr>
</table>

<a th:href="@{/account/add}" href="/account/add">account 추가</a>
</body>
</html>
- add.html
...생략...

<form method="post" th:action="@{/account/add}">
	Email : <input type="text" name="email" />
	<button type="submit">추가</button>
</form>
<br/>
<a href="/account/list" th:href="@{/account/list}">account list</a>

...생략...
- view.html
...생략...

<div>
	email : <span th:text="${account.email}"></span>
</div>

<div>
	<a href="/account/list" th:href="@{/account/list}">목록</a> <br/>
	<a href="/account/1/modify" th:href="@{/account/{id}/modify(id=${account.id})}">수정하기</a> <br/>
	<form method="post" th:action="@{/account/{id}/delete(id=${account.id})}">
		<button type="submit">삭제하기</button>
	</form>
</div>

...생략...
- modify.html
...생략...

<form method="post" th:action="@{/account/{id}/modify(id=${account.id})}">
	Email : <input type="text" name="email" th:value="${account.email}" />
	<button type="submit">수정</button>
</form>
<br/>
<a href="/account/list" th:href="@{/account/list}">account list</a>

...생략...
지금까지의 내용은 github에 branch:004-using-jdbc[새창]로 확인하실 수 있습니다
참고 사이트 :
- Spring 공식사이트 - Accessing Relational Data using JDBC with Spring
- Mkyong.com - Spring Boot JDBC Examples
Spring Boot + MyBatis 프로젝트 연습 목록
- 01. 신규 Spring Boot 프로젝트 만들기
- 02. Thymeleaf, spring-boot-devtools 추가
- 03. Spring Boot에 H2 추가
- 04. Spring Boot + H2 + Jdbc (현재 포스트)
'냐냐한 IT > 냐냐한 Spring Boot' 카테고리의 다른 글
| MyBatis Logging 추가 (0) | 2019.09.25 |
|---|---|
| Spring Boot + H2 + MyBatis로 사용해보기 (0) | 2019.09.22 |
| Spring Boot에 H2 추가 (0) | 2019.09.16 |
| Thymeleaf, spring-boot-devtools 추가 (0) | 2019.09.14 |
| 신규 Spring Boot 프로젝트 만들기 (2) | 2019.09.12 |